Overview
The Time Tracking module lets you log work hours against any monday.com item. Each entry is called a worklog — it records the item, the date, the number of hours, and an optional description.
Worklogs are stored inside the plugin, not in monday.com's native time column. This means you get dedicated date-range filters, two view modes (table and stack), Excel export, and full integration with the Timesheets and Reports modules.
Logging a Worklog
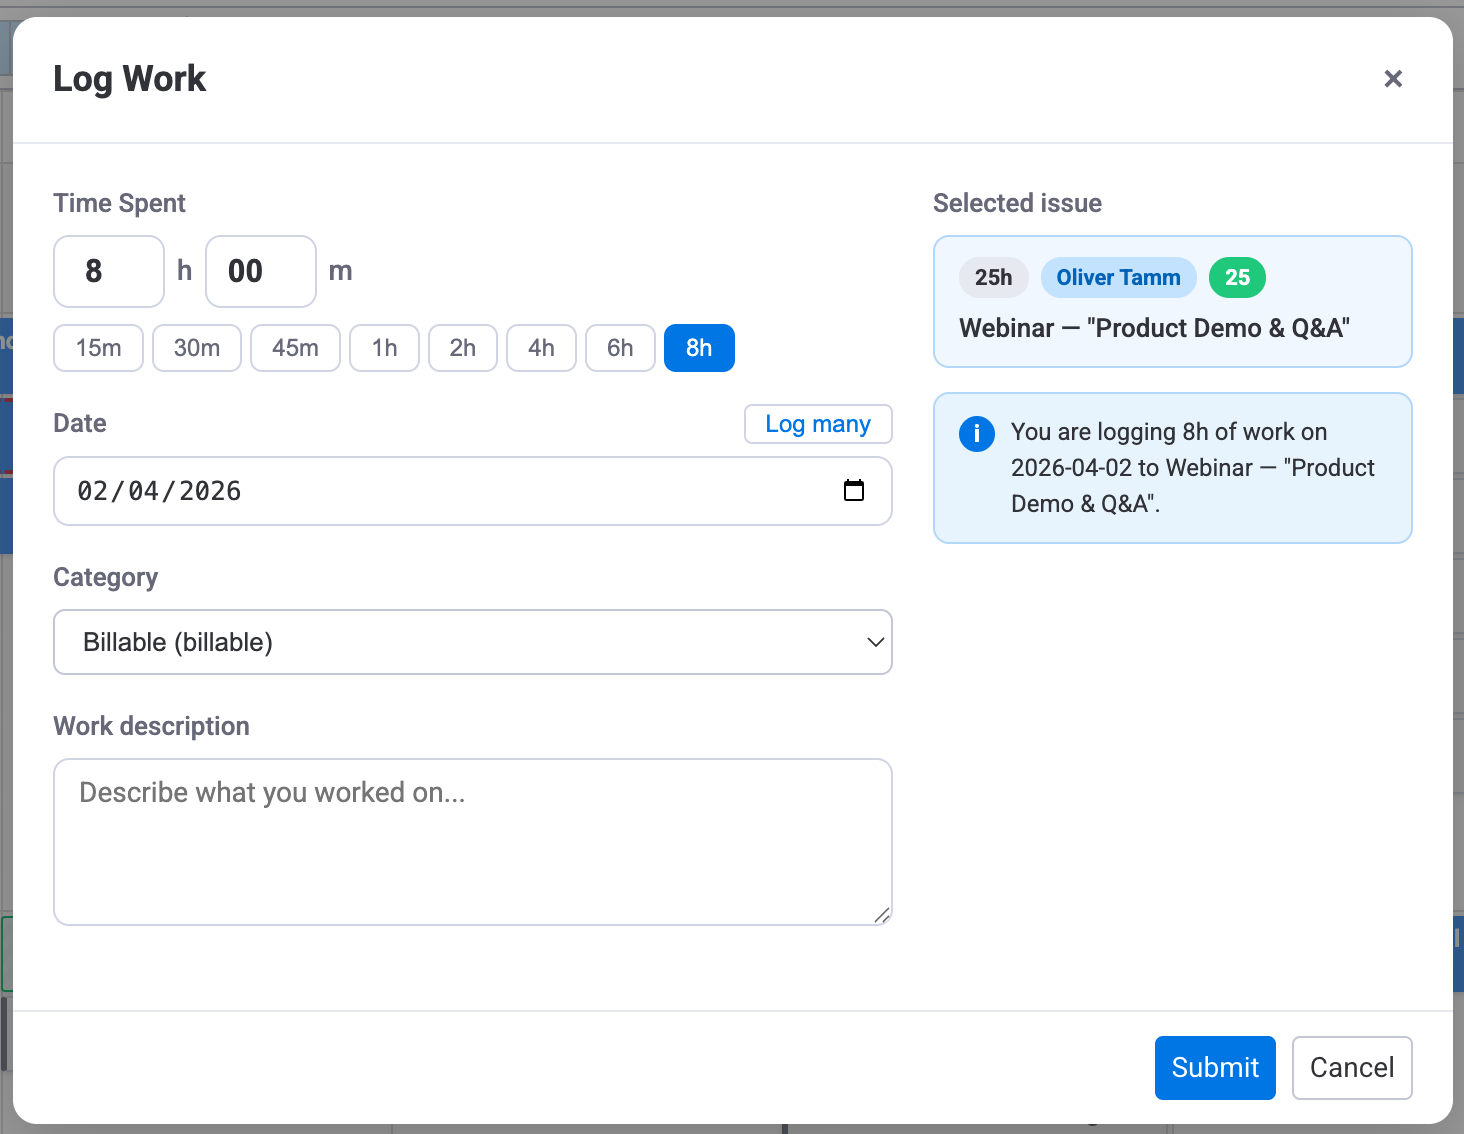
Click the + Worklog button in the toolbar to open the worklog form. Fill in the fields below and click Save.
| Field | Details |
|---|---|
| Item | Search and select a monday.com item. Type at least two characters to search across all boards. Recently used items appear by default. |
| Time Spent | Enter hours and minutes separately (for example, 1h 30m for 90 minutes). Use the quick-select buttons (15m, 30m, 45m, 1h, 2h, 4h, 6h, 8h) for common durations. You can log only minutes, only hours, or both. |
| Date | The day the work was done. Defaults to today. Use Log many to log the same duration across a date range (weekends excluded). |
| Category | Select a worklog category (e.g. Billable, Non-Billable). The dropdown appears when two or more categories are active. When only one category is active, it is assigned automatically. See Worklog Categories below. |
| Description | Optional text describing what was done. Useful for timesheet reviews and audits. |
1. Click "+ Worklog"
Open the form from the toolbar at the top of the Time Tracking view.
2. Pick an item
Type in the Item field to search. Select the item you worked on from the dropdown.
3. Set time spent
Enter hours and minutes separately, or use the quick-select buttons for common durations (15m, 30m, 1h, 8h, etc.).
4. Choose date and category
Pick the date the work was done. If multiple categories are configured, select the appropriate one (e.g. Billable or Non-Billable).
5. Add a description (optional)
Describe what you accomplished. This text shows up in the table view and in exports.
6. Submit
Click Submit. The new worklog appears immediately in whichever view is active.
Logging work on behalf of another user
Admins, App Admins, and timesheet approvers can log work for another user directly from the Resource Scheduler. Admins can act for any team member; a timesheet approver can log work for the users they are assigned to approve (including via an "all users" approver rule). Click an empty cell on that user's row and pick Log time, or open Log Work from an existing task assigned to them. The dialog shows a banner confirming whose worklog is being created — with a Log for myself instead link to switch the entry back to your own name without closing the dialog.
Worklogs created on behalf of a user are displayed under the target user. When the creator differs from the assignee, a subtle "Created by: [name]" label is shown on the worklog card, popup entry, and item view. This helps team leads quickly identify delegated entries while keeping the UI clean for self-logged worklogs. The label appears in the Stack view, the Matrix cell popup, and the Item View.
Table View
Table View is the default layout. It lists every worklog in rows with sortable columns.
| Column | What it shows |
|---|---|
| Item Name | The monday.com item the work was logged against. Click it to open the item. |
| Board | The board the item belongs to. |
| User | The person who did the work (avatar and name). |
| Date | The day the work was performed. |
| Hours | Total hours logged. Click the cell to expand and see individual entries when several worklogs share the same item and date. |
| Description | Free-text description of the work. |
Click any column header to sort ascending or descending. Combine sorting with a date-range filter to zero in on the worklogs you need.

Stack View
Stack View arranges worklogs in a kanban-style layout grouped by day. Each column is one date and each card inside it is a single worklog.
- Each column represents a day in the selected date range.
- Each card shows the item name, hours, and the person who logged them.
- Column headers display the date and total hours for that day.
- Helpful for spotting unlogged days or uneven workload across the week.
Date Range Filters
Use the date-range selector in the toolbar to control which worklogs appear. Both Table View and Stack View respect the active filter.
Predefined ranges
- Today — worklogs for the current day only.
- This Week — Monday to Sunday of the current week.
- Last Week — the previous full week.
- This Month — first to last day of the current month.
- Last Month — the previous full calendar month.
Custom range
Choose Custom to pick any start and end date with the calendar picker. This is useful for billing cycles, sprints, or any period that does not match the presets.
Worklog Categories
Every worklog is assigned a category (e.g. Billable or Non-Billable). When two or more categories are active, a dropdown appears in the log work dialog. When only one category is active, it is assigned automatically and the dropdown is hidden.
Categories marked as Billable have their hours aggregated separately in timesheets, reports, and Excel exports — making it easy to track invoiceable work.
Admins configure categories in Settings → Worklog Categories.
Editing and Deleting Worklogs
You can change or remove any worklog as long as it is not part of a submitted or approved timesheet.
Editing
- Click a worklog row in Table View to open the edit dialog.
- Change any field — hours, date, description, or item.
- Click Save.
Deleting
- Click the trash icon () on the row.
- Confirm the deletion in the dialog that appears.
- The worklog is permanently removed.
Excel Export
Click the Export button () in the toolbar to download your worklogs as an Excel file. The export includes every worklog that matches the current date-range filter.
Columns in the export
| Column | Content |
|---|---|
| Item Name | Name of the monday.com item |
| Board | Board the item belongs to |
| User | Full name of the team member |
| Date | Date the work was done (YYYY-MM-DD) |
| Hours | Hours logged |
| Category | Worklog category name (e.g. Billable, Non-Billable) |
| Billable | Yes or No |
| Description | Work description text |
- Personal records — export "This Month" for a quick hours summary.
- Client invoicing — filter by a project board and export the billing period.
- Audits — export a custom date range for internal or external review.
Item View Time Tracking
You can add a Time Tracking tab directly to any monday.com item. This lets team members view worklogs, see remaining estimates, and log time without leaving the item — on both desktop and mobile.
How to add the Time Tracking tab
Open any item in monday.com and click the + button in the item's tab bar to add a new view. In the Item Views menu, click Explore more views at the bottom.
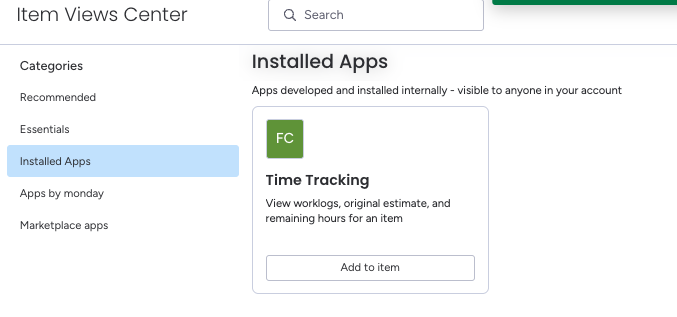
In the Item Views Center, go to Installed Apps and find Time Tracking by WorkHub. Click Add to item.
Once added, the Time Tracking tab appears on the item. It shows the same view on both desktop and mobile:
- Original Estimate — the total estimated hours for this item.
- Logged — total hours already tracked across all entries.
- Remaining — hours left (Original Estimate minus Logged).
- Log Time form — Date, Hours, and Description fields to record a new worklog.
- Entries list — all worklogs for this item, showing date, hours, description, and who logged it.
The same Time Tracking tab works in the monday.com mobile app. Team members can view estimates, log hours, and see their entries directly from their phone. See Mobile Time Tracking below for details.
Mobile Time Tracking
WorkHub offers a mobile item view for time tracking, so your team can log hours on the go — on-site, on the road, or between meetings.
The mobile view shows:
- Original Estimate — the total estimated hours for the item
- Logged — total hours already tracked
- Remaining — hours left (Original Estimate minus Logged)
Below the summary is a Log Time form with Date, Hours, and Description fields. Below the form is the Entries list showing all worklogs for this item.
Works on both Android and iOS through the monday.com mobile app. No separate app installation needed.